Showing posts with label DIY. Show all posts

Sunday, March 1, 2015

{the better OCM} Oil Cleansing Method

Writing out my skin-care regime (again!) in response to a lot of recent requests!

For nearly 2 years, I've been following a skin-cleansing method called the Oil Cleansing Method, or OCM.

After more than a decade of struggling with deep, painful, cystic-type acne, finding something that actually worked was a God-send.

It doesn't matter how much self-confidence you have, the way you look matters to some degree. And while I had become used to this acne struggle throughout junior high, high school, and college, I was always on the look out for something to help. I would tell myself, my mom, and my doctors the same thing. I never expected to have perfect skin. But if I could find a way to manage my acne or decrease it in someway, I'd be happy.

As you can read in my previous post, I tried everything. Topical gels and creams, oral medications, birth control, Proactiv, hormone testing, every different cleansing system you could find at Walmart....even Accutane.

The topical stuff just dried out my skin.
The oral meds didn't seem to make much of a difference.
Birth control gave me mood swings and I questioned it's impact on my future fertility.
Proactiv ended up giving me their money-back guarantee.
Hormone tests all came back normal.
Cleansing systems never really did anything but dry out my skin.
Accutane seemed to help....for awhile. But there's something funky about a medication that effectively shuts off your body's natural oil production. Also, the pregnancy warning was freaky.

I had mostly given up hope. I wondered if my acne would follow me all the way to the nursing home. My purple scarring had become severe enough that I refused to leave the house without makeup.

Then, on Pinterest (where else?), I read about the OCM. 

The thought process behind using oil to wash your face begins with the concept is that oil dissolves oil. By using "purifying" and "cleansing" products on your skin, the dirt, oil, and grime isn't being removed from your skin. Also, using drying washes can cause your skin to produce more oil. The skin is self-cleaning, but when we strip it of oil, the natural reaction is for it to produce MORE oil. Using oil to "wash" your skin helps restore it's natural healthiness, and over time can even out it's composition.

I tried the OCM for awhile with a Castor Oil/EVOO combo....aaaand hated how my skin never felt clean. This combo left a film on my face and my makeup seemed to just slide off.

Then I was told about Coconut Oil and tried that with the same original method described in my first post.


And it worked! My acne cleared up (once it became used to the oil) and my skin, while still occasionally oily, is basically "normal". I needed to implement the use of a baking soda + lemon juice scrub to take care of bumpy oil build-up on my nose, but that wasn't too much of a hassle.

Fresh-faced! 2+ years with OCM!
I was still using the original OCM until I went on a work trip about a year ago. For some reason, I modified my face-washing method for a few days.

That's what changed everything. Just over those couple of days, I saw a change in how much easier it was to wash my face, and I felt like my skin was reacting better too!


So, here's my modified process, which I've been using for just about a year!


At night:
1. Scoop out some coconut oil with a spoon (not fingers, to avoid bacteria growth), and massage all over face...ON TOP of makeup. Rub into eye area, too.
2. With a DRY washcloth, wipe oil off of face. All makeup should be removed through this step. 
3. When oil has been wiped off, splash very warm water on face. With the other side of your DRY washcloth, wipe/massage face in small circles until all water is removed. Don't be shy with rubbing hard, especially in bumpy/blackhead-prone areas. (for me, T-zone area)
4. Go to bed! That's it!

In the morning: 
1. Do nothing. Just shower, apply makeup, etc. as usual. 
2. If skin feels too dry, massage a little oil on dry/tight areas.


I've found that this modified method:

1. Goes a lot quicker. No longer do I need to "steam" my face with a washcloth.

2. Removes the need for my aforementioned every-other-day baking soda scrub. The dry washcloth scrubs my skin enough to keep it niiiice and smooth :) The scrub worked, but the lemon juice burned if I did have a breakout. And the scrub left my face a little dried out, resulting in increased oil production the next day.

3. Removes my makeup more completely. I hated realizing that by steaming my face with the other method, I was basically steaming an oil/makeup mix into my pores.


I've shared this method with others and coconut oil seems to work best with people who have super oily skin. Some friends with naturally drier skin have found that coconut oil dries their skin out too much, Argan Oil might be a better option. I've tried EVOO, castor oil, jojoba oil, etc. but coconut works best for me. Depending on your skin composition, you might need to try a couple different oils, but the method itself can work with any type.

I should say here that the OCM might not work for your skin. Maybe you try it and hate it or your skin gets worse...please don't curse your jar of coconut oil because of me!

But, if you're curious about a natural way to care for your skin, or if you're struggled to find anything to help clear up your acne, my suggestion is to try it out! My attitude going in was that my skin couldn't get any worse, so what did I have to lose?!


A couple last tips:

1. For anyone with especially severe acne, when starting this method off, please be gentle with your skin. You don't want to scrub too hard, but if/when your skin ends up clearing up, then you can move on to being more aggressive with your dry washcloth exfoliation.

2. The oil might stain your washcloths, especially if you're removing a good amount of makeup. So, take that into consideration...white, expensive washcloths might not be the best for using in this method :)

3. Use a new washcloth every. single. night. Re-using washcloths can lead to bacteria growth, just like sticking your fingers in the coconut jar.


The OCM, specifically this revised OCM method, has changed my skin forever. I hope this might help you to improve your skin as well!!!

The best skin of my life!!!
Please don't hesitate to comment or email me with questions!!

Wednesday, October 23, 2013

Five Favorites

It's been awhile since I linked up with Hallie for a round of Five Favorites! I guess it's just been awhile since I've had anything favorite-y to write about!


[1] If you follow my on Twitter, you might have seen that I got a pretty exciting delivery on Monday: FURNITURE! Brand new, adult furniture. Amazing. I tried to take a panoramic pic this morning, and while it's a bit disjointed, I think it will suffice for now.


YAY!


[2] While we're in the realm of furniture, I have two wing-back armchairs that I loooove. Well, I have one that I love, and one that I will love....once I'm finished with it's transformation. (Read: I'm dying a chair. And it's thrilling.)


[3] I found this meme on Rachel's blog yesterday and just couldn't resist sharing. Hilarious.


[4] Are you a fan of Lourde? I'm obsessed and la-la-la-laaave her newest track. Listen and laave.


[5] Y'all, Sean and Catherine are getting married. I'll be sending out invites to my viewing party next month.


Where was this game hiding when it was Sean's season?! Maybe we can revise it for the wedding.....though, maybe it doesn't need revision....

Head over to Hallie's for other favs!

Tuesday, May 7, 2013

Pinterest Review: DIY Thyme and ACV Toner


Like I've said before, I'll try pretty much any kind of skin care remedy out there. After years of testing different products for my oily and acne-prone skin, I love it when I come across a DIY recipe that could not only save me money, but also be better for my skin!

I came across this recipe for a DIY Thyme and Apple Cider Vinegar Toner, another project from Delighted Momma. This toner is said to help clear skin better than benzoyl peroxide...whaa? Yes please let me try this!

So I got my thyme and I got my Apple Cider Vinegar and I heated and mixed...


And I strained (using the mini strainer that I used to make my hippie coffee) and poured into an old hotel shampoo bottle...


And then I tried it on my skin.

I'm sure that everything they say about thyme being better than benzoyl peroxide is perfectly true....but let me make a couple observations about this particular toner:

1. The smell of ACV is wayyyyy strong. Like, so-strong-I-had-to-air-out-my-entire-house strong.
2. Also, I hate the smell of vinegar....
3. ...thus I HATED my face smelling like ACV.

So it's fair to say that I was not a fan of this particular DIY....maybe there's another liquid I could use instead of ACV? It might be completely fine for other less babyish peeps, but I'll be the first to admit that I'm a baby. Totes.

Any suggestions? Has anyone else used this and had success? I'd love to know if it was worth the smell...but at this point, all it's going to benefit is my compost pile :)

xo, Morgan

Monday, April 22, 2013

how [not] to compost

A few months ago, with a little bit of advice from Dweej, I ventured into the composting world.
I was so excited.
I told anyone who would listen.
Well, I think I did something wrong.

Let me walk you through this.....
Since moving into this house in August, I've had an inclination to do more homey things.
In January, I went and got myself a Rubbermaid bin, threw some leaves in the bottom (we were in a short period of no snow), put the bin on my back porch, aaaand....that was it.

So there it sat. On my back porch. For 3 months.
I added tons and tons and tons of veggie and other kitchen scraps (no meat or dairy). Stirred occasionally.
And all seemed to be fine.
I mean, it was cold for much of that time, what with the snow and ice and all....

And then it started getting warmer...

*disclaimer: sick nasty photos ahead*

I was getting ready to leave for Portland the first week of March and I realized before I left that I should empty the overflowing bucket we kept in the pantry for the compost pile. While I'm pretty sure all of my roommates knew where the bin was, I was the only one who ever emptied the kitchen bucket.
No big deal, it was my project anyway.

So I went out onto our porch and when I opened the bin, oh. my. gosh. The most disgusting smell EVER.
I quickly dumped the kitchen bucket into the bin and there was so much food in the bucket, it was packed solid...and moldy. Sick. nasty.

seemingly harmless-looking bin, right?

wrong.
Needless to say, I didn't return the bucket to the kitchen because I didn't want anyone to continue this horrible cycle while I was gone for 5 weeks. I also moved the bin off the porch and let it sit in the back yard while I was gone in case someone had the inclination to drop scraps straight into the bin.

When I finally returned from my trip, I borrowed a shovel from a friend and dug a hole where our landlords used to have a compost pile and proceeded to distribute my "compost" into the hole.

the hole

sick. nasty.

after the deed had been done.

sludge. cue gagging.
So my question is this: did I compost wrong? I know online there are a million and one products you can buy to start your compost bin (one of my coworkers apparently has bought a bin and "organic soil" for his bin...what the hey?!) but there was no way I was going to do that. Part of me wonders if maybe I did it right, and compost is supposed to smell like the worst thing you've ever smelled in your life (even worse than the most horrific baby diarrhea). But maybe all I did wrong was add too much moisture, or not let it ventilate enough, or not add enough yard waste.

At the end of the day, I'll be living in an apartment starting in August so I [obviously] won't be having a compost bin. Gross. But maybe there's something that I missed during this process? At least in the future I'd like to try again!

Please. Advice. Anyone?

xo, Morgan

Saturday, April 20, 2013

Pinterest Review: DIY Lemon Juice and Baking Soda mask


I've posted before about seeking natural remedies for keeping my skin feeling refreshed and clear, so when I came across this recipe for a mask made with orange juice and baking soda that promised to not only refresh your skin but also help take care of blackheads, I knew I had to try it.

Unfortunately, I don't usually drink orange juice, so I didn't have any and had to improvise. Fortunately, I ALWAYS have lemon juice in my fridge and I've seen other DIY masks with lemon juice as an ingredient, so I used that as a substitute.


Basically, just mix lemon juice and baking soda until you have a paste-like substance. If it gets too thick, add more juice...if it's too soupy...well, I think you get it...

Then slather it all over your face, wait about 15-20 mins or until you're feeling crusty, then massage the crust back into your face with some warm water and rinse.

I'll say this: my face felt refreshed. As far as blackheads, meh. I'm not sure that I saw a difference, but I liked that this was super easy (and cheap) and my skin felt like it was actually clean for hours following. Overall, I'll do this one again, but I wouldn't say that this is the mask of all masks. I'm still on the hunt.

Do you have any DIY masks/washes that you use? Please share! :)

xo, mo

Wednesday, January 23, 2013

Pinterest Review: DIY Vitamin C Mask


As promised, here is the first of what I hope to be weekly reviews of Pinterest DIY projects! Some will be skincare, some crafts, some even maybe gardening-related projects (I started composting last week!!! SUPER excited :) In the past year, I've pinned more ideas than I can remember with the thought "oh, I really need to do this sometime!"

well sometime is now.

Sooooo here we go! 

I'm always looking for new facial masks that can leave my face feeling refreshed. So you can imagine my glee when I found a DIY Vitamin C mask from Delighted Momma!

Vitamin C (as I'm told) is great for your skin as a natural brightener and since I had some VitC just laying around (don't ask why), I figured I'd take a whack at this recipe.

First you get yourself some powdered VitC...maybe you could just crush up some swallowables? Not sure. I got mine at Natural Gourmet. It can also be found here.
 cute bowl optional.

Then mix in some H2O until you've got a paste of sorts.
 Like so.

Aaaaaand spread it all over your face.
 better keep those eyes open to avoid VitC up the nose...

That's it! Check yourself out to ensure complete facial coverage.
Don't be concerned if it burns a little...happened to me too.

...wait for awhile until you're feeling kind of crusty... 

Then use a warm washcloth to remove the crustiness...
And voila! My skin definitely felt smoother and...brighter? I don't know....it felt....refreshed is the word, I suppose. A few hours later, my skin was still oil-free, which NEVER happens so that was awesome.

I'd definitely recommend this Pinterest DIY and count it as a success!

Have you tried this mask? I'd love to hear about your results!

Monday, December 24, 2012

Crafty Christmas: repurposed painting

My little sister is one of the most difficult people to shop for. Usually, I'd get her a scarf or maybe some earrings, but after years and years of getting the same types of gifts, I felt that we needed to shake it up a little.

And then I remembered something I saw on Pinterest which I'd been wanting to do and BAM!
Christmas present.

Most directions for this project say to use an old paint-by-number painting buuuuut I didn't have any of those just laying around...but what I did have was a canvas that I inherited from one of the girls who lived in my old apartment before I moved in and paint.


Thus, my makeshift paint-by-number. Dontcha love my skills?

I used a quote from her favorite TSwift song on Red...Then painted over it all with white paint...


...waited for 12ish hours and peeled off the letters...


voila!

one recommendation I have is that I painted the edges...I like that you can tell that the white was painted over it, but that's just me :)


So there you have it!

Hope your Christmas is full of love and joy!

Sunday, December 16, 2012

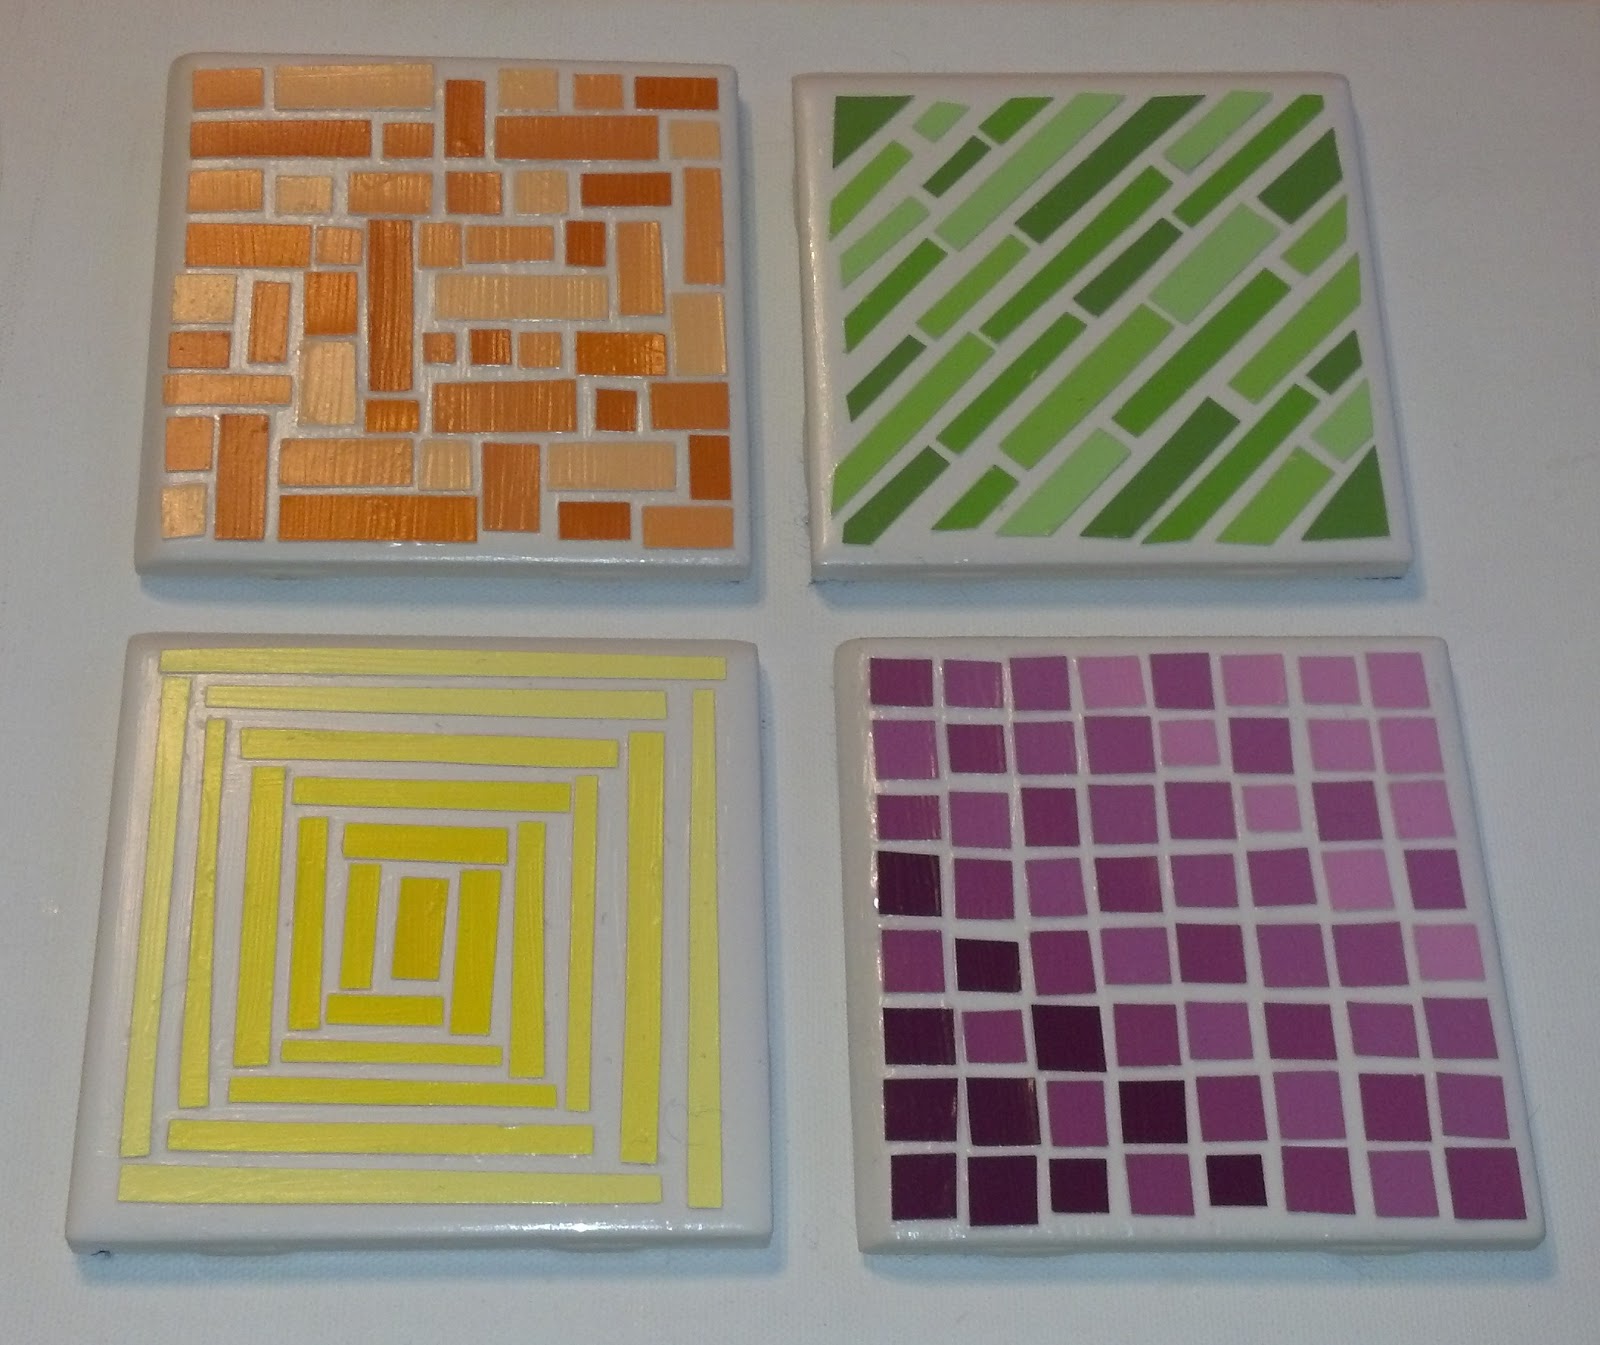
Crafty Christmas: Paint Chip Coasters

I love giving gifts...I truly do get more joy out of giving a fabulous gift that the person recieving it loves.
And this is why one of my favorite gifts to gift is homemade coasters.

They're impressive, they're useful, and they're SUPER easy to make.

I've made coasters before, but wanted to do something different this time around....and thus came paint chip coasters!

I've seen other paint chip coasters on Pinterest, but honestly, I felt like I could do something a bit better than what I found on there...

I got the tiles [[$0.13 each!]] and paint chips [[free!!!]], and had decided upon the gradient theme with general colors being yellow, green, pink/purple, and orange.


Then came up with the designs for each coaster (really helpful as to allow things to go smoother throughout the actual putting-together phase)


The basic idea is to mod podge the paper to the tile and then spray with a moisture resistant sealant...when making photo coasters, I advise against mod podging the top of the pictures, but with these paint chips, I mod podged both sides and then sprayed.


Then adding felt to the four corners of the bottom of the tile to avoid scratching and voila! The perfect gift!


I gave these to my dear friend Claire and she loved them :)

Stay tuned for other Crafty Christmas gifts!

Wednesday, May 2, 2012

Catholic Swag

Like I've said before, I'm a teeny tiny bit obsessed with Pinterest. A hazard that comes along with loving Pinterest is the idea that I can do pretty much anything, and until now, I haven't ventured to complete too many projects, mostly because I'm still in school and don't usually have the time, space, or resources to do them.

So, I have all these grand ideas and plans to put into action once graduation and the big move home are over....but, sometimes things just fall together...and this is how I got my brand new, CATHOLIC inspired sweatshirt :)

A little background info: for my birthday, I basically asked my mom just for a bunch of Catholic tshirts...and she gently suggested that perhaps I should ask for some professional, "big girl" clothes. *sigh* fiiiiine. However, being the generous woman that she is (and my father as well, don't want to neglect him), she ordered a fab tshirt that I LOOOVE...you can find it here. And so I was satisfied, for the time being. But since I had a few other shirts in mind that I was hoping for, I decided that those would be my first projects once I get home...raid my brothers' undershirt drawers and create!

But, like I said, sometimes things just fall together. Whilst filming this video, I found a sweatshirt. Yes, found. And yes, it was dirty. But luckily for little sweatshirt, I was doing laundry that day! And so began the brainstorming. I'll spare you the deets, but my inspiration finally came from this tshirt at Phatmass.com.
[btw...shameless plug...phatmass is freaking awesome. check out their stuff. seriously.]

The following are pics of the final products, I forgot to take pics throughout but if you have questions, feel free to comment!

front: fleur de lis

back: haters gonna hate
Basically, this was super easy...the front fleur de lis was a stamp that after I imprinted it onto the seatshirt, needed some filling in with a thin brush. For the back, I found some indoor/outdoor stickers at Hobby Lobby, stuck them on, and painted over. When the paint was semi-dry, I peeled the stickers off and have them saved to be used again! And the "Proverbs 9:8" was free-handed [as you can probably tell lol]

Pretty simple and a monkey could probably figure it out, but I didn't want to label this as DIY unless if I actually included a rough outline of directions :)

psyched to wear this asap :)

Saturday, April 28, 2012

DIY wire rings

Another Pinterest inspired DIYs...with a little twist. (pun intended)  I saw a post about how to make a "knot ring", which really intrigued me because I have tried to make wire rings before but always end up not being able to come up with a solution for the sharp ends of the wire...I've tried filing, cutting, glueing, etc...nothing worked! So when I saw the knot ring, it dawned on me: "make the wire end at the TOP of your finger!" DUH. 

While I love the look of the knot ring, all I had was 24 gauge wire, and the knot ring would look probably cooler with 20 gauge. Solution? Find/scavenge for old/unused beads to have as the "stone" in my ring! Perfect!
So here's the play-by-play:

You'll need some wire (I used 1.5 feet), a bead of your choosing - size doesn't matter, pliers of some sort, and a highlighter or marker.

1. Measure - using your cut wire - how big you want the ring to be. Once you've decided on a finger and size, find a marker of some sort that is the same size around as your finger...this will be a "replacement finger" so you will have both hands to work with.


2. Wrap wire around chosen marker/item and poke wire ends through appropriate sides of bead hole.


3. Wrap wire around marker and through holes once more and begin to encircle bead with the wire, poking in and around other wires to ensure that the loops stay in place.


4. Once you are done wrapping bead and have used up all of the wire, use pliers to bend ends into the center as to prevent scratching of your fingers...this is where you can be a little more experimental as far as how it will best suit you to avoid scratches.


5. Voila!

***additional pictures of other rings with similar concept*** 


This final photo is of a ring made of wire alone, sort of a variation of the original knot ring...just wrapped the wire around itself until it began to take the shape of a bead.


I'm super happy with the results and even more so because I didn't spend a penny to make these beauties...I had the wire left over from a previous project and found the beads in my jewelry boxes...double win! :)

Happy DIY-ing! :)
Related Posts Plugin for WordPress, Blogger...